
01 / The opportunity
Why might someone buy this?
A planned mounting and release system may avoid rebuilding an adhesive attachment and keep the board enclosed. It must beat a simple reusable strap and a separate display stand; a latch alone is not automatically a better product.
Who might need it?
- Lite makers with a working DIY arcade display.
- Demonstrators alternating between screen sessions and stock appearance.
- Not a turnkey console, robot repair or universal screen mount.
The task is temporary attachment, not a broken robot. A dedicated glued build may already be satisfactory.
Current customization and a documented mounting method support an improvement hypothesis, not a claim of frequent damage or difficult removal.
A separate screen avoids robot loading. An on-body product must justify the additional fit and motion constraints.
02 / Existing solutions
How owners handle it today.
| Current solution | What it does | What remains |
|---|---|---|
| Build the published arcade shell ↗ | The maker provides a complete DIY direction covering the screen, USB setup, app and attachment. | Its outer attachment uses hot glue. A deliberate release is the proposed difference; actual glue damage is not documented here. |
| Use pin-joined costume pieces ↗ | The pumpkin build already joins body parts with pins and permits a separate head cover. | Its joins hold costume pieces together; an independently retained screen carrier and release would address a different task. |
What a better product would need to do
- Measure a specific Lite. Keep openings, ports, the head mechanism and body/base seam clear. Never bridge parts that move relative to each other.
- Use replaceable contact pads and low closure force, without factory holes or adhesive on the robot. Validate shell pressure and finish effects.
- Enclose one measured board with connector access, ventilation and mechanical retention independent of its USB plug. Add an intentional release and slide-out stop.
- Keep a loose USB loop to the Lite host outside every permitted movement path. No cable wrapped around the rotating body.
- Measure complete added mass; compare motion, temperature and access with the stock robot. Do not override protections to accommodate the mount.
03 / Research evidence
How strong is the evidence?
Opportunity type: Accessory improvement / documented DIY activity
The arcade guide, last changed April 7, 2026, still specifies gluing the outer shell when checked October 28. It establishes an activity and mounting method, not an owner complaint about removal. September 28 and October 1 entries on the maker’s community wall show current costume activity. Removability as a purchase motive remains a hypothesis.
The current maker arcade guide specifies a small ESP32 display and USB connection to the Lite host, and glues the outer shell to the robot. The separate pumpkin design already has pin-joined body pieces; not every skin has the same attachment gap.
Owners alternating between an arcade build and stock appearance may value a deliberate release. A removable carrier separates screen servicing from attachment to the robot.
How often owners remove the arcade; a suitable clear contact zone; allowed added mass; exact board variants; marking, slip, heat, cable behavior and delivered-price preference.
Selected evidence
Official arcade build and attachment instructions ↗
Current instructions name the screen/USB setup and glue the outer arcade shell to the robot without a snap or screw fixing. Relevant file last changed April 7.
Post: · Checked: A maker build, not an owner complaint or a test of the proposed mount. Its attachment instructions do not establish how often owners remove the shell.Recent customization examples ↗
Relevant entries dated September 28 and October 1, 2026 document pumpkin customization. Underlying original posts were not independently retrieved.
Checked: Supports customization, not arcade adoption or a removal request. Curated examples and likes are not independent complaint counts or demand.Current hardware and customization FAQ ↗
Documents customization and shared mechanical design of Lite/Wireless, with different electronics.
Checked: Undated current guidance; does not approve added display mass, mounting areas or universal fit.The maker’s arcade build establishes an activity and current glue attachment. Costume examples show personalization. Neither demonstrates dissatisfaction, removal frequency, sales or willingness to pay for this mount.
Search interestExact-model arcade/skin searches found maker files and community examples. No reliable search-volume or Trends series obtained. Visible likes are discovery signals, not accessory traffic or demand.
04 / Product design
How the product could work.
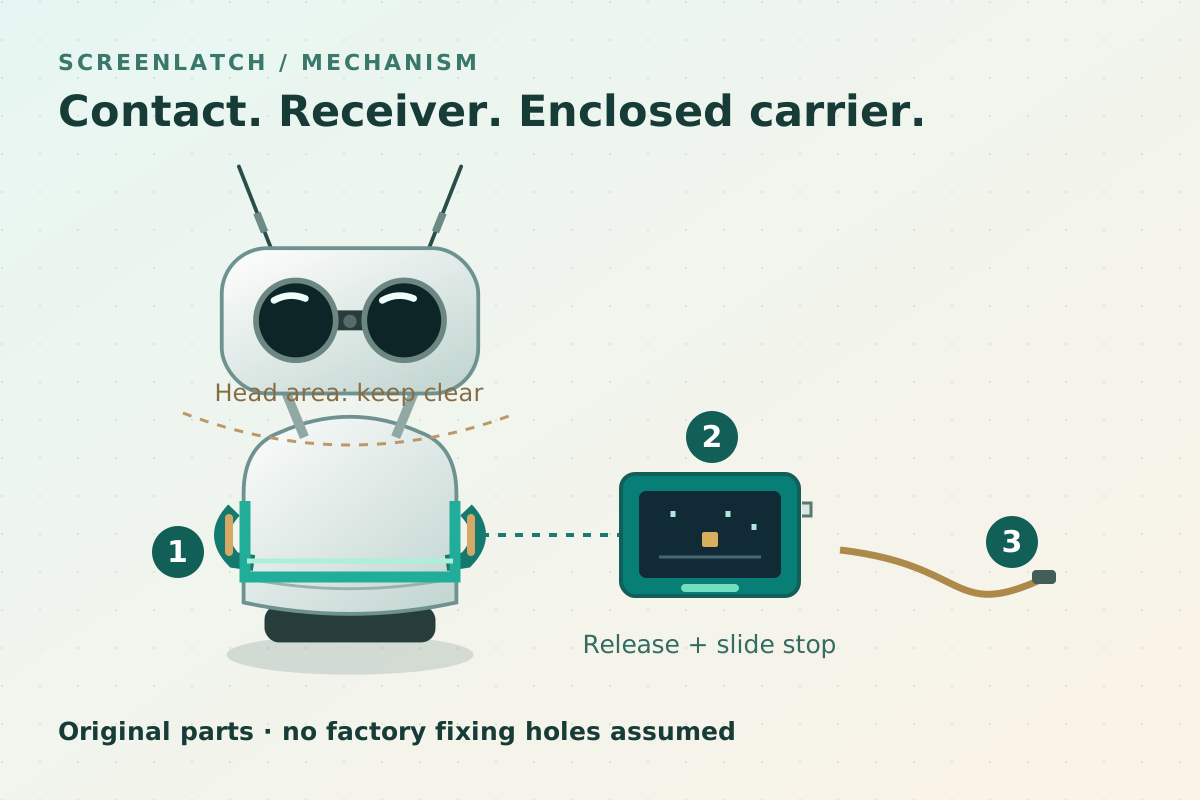
- 1 · Padded mountMeasure clear contact zones; avoid openings and the body/base seam.
- 2 · Enclosed carrierOne display variant, a release and slide stop. No copied costume shell.
- 3 · Slack and clearanceAn open guide and loose USB loop. Check complete mass and all movement before powered use.
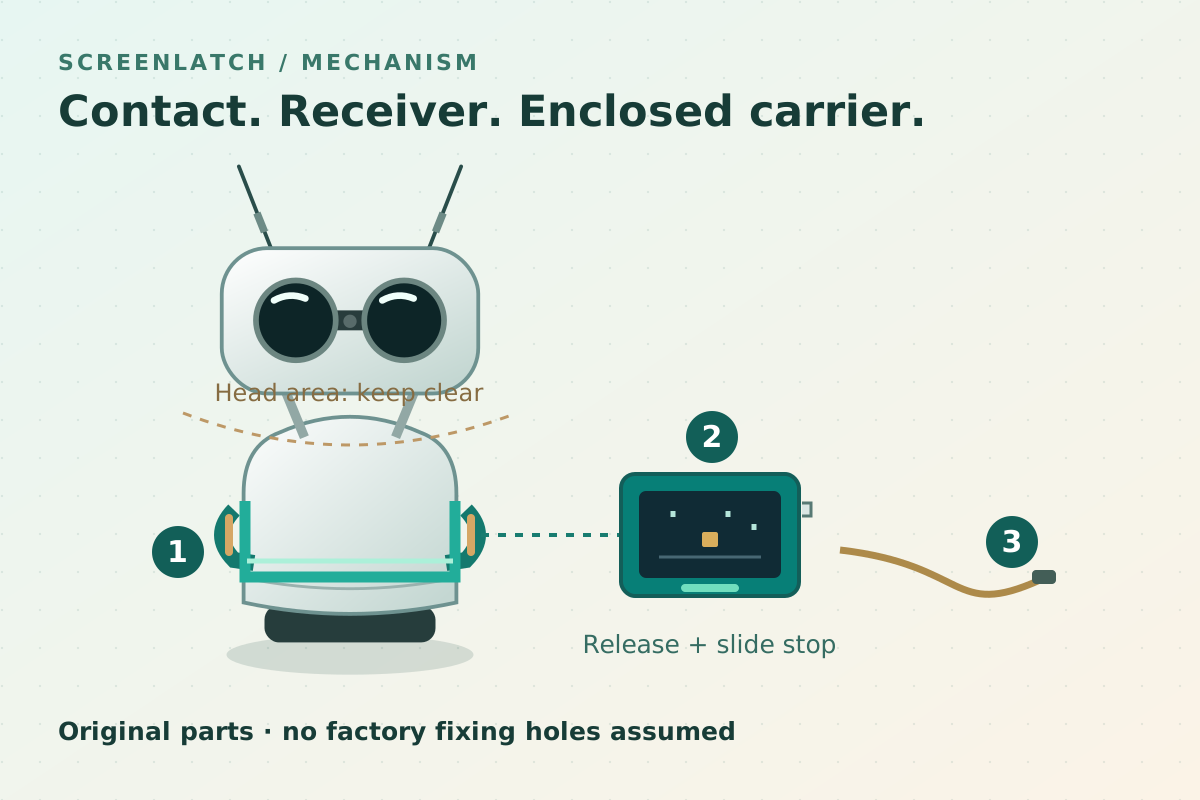
- 1 · Padded mountMeasure clear contact zones; avoid openings and the body/base seam.
- 2 · Enclosed carrierOne display variant, a release and slide stop. No copied costume shell.
- 3 · Slack and clearanceAn open guide and loose USB loop. Check complete mass and all movement before powered use.
- With power off, close two padded mount parts around a measured body-shell area, avoiding openings and the base seam. Exact contact geometry is an engineering task, not a known factory interface.
- Install the owner’s specified board in an original carrier with a rear cover. Slide it into the receiver until a mechanical stop and deliberate release retain it.
- Route the USB lead to the separate Lite host with slack outside moving parts. The mount adds no power circuit or software. Validate clearance, loading and heat before powered operation.
- To remove, power down, unplug, release and slide the carrier clear; open the mount when returning to the stock appearance.
Directions worth considering
Padded mount and slide-out carrier — recommended
Benefit: Separates body fitting from screen removal; can be designed around one enclosed board.
Tradeoff: More parts and added load. A suitable contact zone may not exist; a simple strap may win.
Reusable strap and basic board case
Benefit: Few parts, low tooling needs and a strong on-body baseline.
Tradeoff: May need repositioning or cover an opening. If it works equally well, the dedicated receiver adds little.
Standalone desktop display support
Benefit: No clamp, cable-motion constraint or added load on Reachy.
Tradeoff: Screen sits beside the robot rather than forming part of its appearance. This may be the better answer.
Our recommendation: Prototype attachment and removal before a decorative shell. Start unpowered with a dummy screen. Continue only if the on-body arrangement matters and this mechanism beats the simple strap or separate stand.
Build the first version
Original two-part padded body mount, hand closure, front slide receiver, enclosed display carrier with release/stop, open cable guide and fit instructions. One Lite revision and one board variant first. The owner supplies the working display/host setup. No official skin, antenna replacement, electronics or software bundled.
Materials and production options
- Prototype original PETG parts, replaceable silicone/TPU pads and a purchased limited-force closure. Validate printing orientation, contact and creep; these are material candidates.
- Use a fastened rear cover, accessible release and open cable guide. No loose magnetic fixing or reliance on a cable for retention.
- For a small batch, compare printed PA12/PETG with purchased pads. Delay molding until measured fit, load and demand justify tooling. Do not duplicate noncommercial skin geometry.
Prototype checks
- Identify the Lite revision, screen-board variant and working host/app. Measure contact areas, openings, cable exit and full motion envelope; record the stock behavior baseline.
- Use a foam/card fit model and dummy screen mass, unpowered. Check contact pressure, access, closure, receiver retention and release before live electronics.
- Compare with a lined reusable strap for repeated fitting, slip, removal and finish effects. Reject blocked openings or a mount bridging moving parts.
- After the static gate, supervise conservative permitted motion with the real complete screen and lead. Check loading, pull, slip, temperature and audio/sensor access before unrestricted use.
- Compare against an ordinary desktop support. A later exploratory pilot with three consenting Lite makers could test the mounting preference; none has been contacted.
05 / Business assumptions
Could this support a business?
A narrow maker accessory rather than a product for every Reachy owner. Sell measured fit and dependable removal, not access to free files. At a $24 target, fabrication, packing, support and returns may overwhelm the margin. The maker skin repository is labeled CC BY-NC 4.0: develop original geometry and resolve permissions for any commercial bundle rather than copying its files or artwork.
Price to test
$24 USD plus delivery is an initial kit-price question, not a validated offer. Compare interest at $19/$24/$29 after showing the contents and alternatives. No electronics, software, robot or arcade shell included.
Costs still to verify
No supplier quote or measured BOM exists; no unit cost or margin is claimed. Quote parts, cover, closure, pads, fasteners, cable guide, assembly/QC, instructions, packaging, fulfillment, fees, returns and acquisition at a small batch size. Check whether $24 is viable before tooling; price less filament is not profit.
Where the first customers might come from
Existing Lite arcade makers, clubs and workshop demonstrators are plausible first audiences. An original tutorial comparing on-body mounting and a separate stand could answer relevant searches. Community demonstrations need venue permission; no partnership, traffic or acquisition cost is established.
06 / Next experiment
What should a builder test first?
The first decisive test: Use a powered-off Lite and dummy display mass to compare this mount with a simple lined strap. Establish non-damaging contact, clear interfaces and a release path first; only then test conservative motion with a real display and compare the setup/removal routine with a separate stand.
Next validation steps
- First test feasibility unpowered with dummy mass; stop on pressure, slip, blocked openings or seam bridging.
- Then compare working mount, strap and desktop support for setup/removal, errors, cable behavior and preference. Do not assume the latch is easier.
- Only after that show an honest demonstration and complete price to relevant makers. A proposed three-person pilot is exploratory; waitlist answers are stated interest, not orders.
What would make us drop this idea?
- No attachment preserves access, finish, normal motion and ventilation with the whole display fitted.
- A simple strap is equally convenient, or a separate stand is preferred.
- Removal is too infrequent to matter.
- Small-batch costs and support cannot support the delivered price owners consider.
Practical risks to check before going further
- No clear contact zone, excessive load or cable interference may make on-robot mounting unsuitable.
- Pads may slip or mark the shell, the closure may obstruct an opening, or the carrier may release accidentally. Board covering and thermal behavior need checks.
- Owners may leave the screen installed or prefer a strap/stand. A narrow audience and support burden may defeat the economics.
- Official skin files are noncommercial-licensed. Original mount geometry does not authorize selling bundled skins, artwork or code; resolve any proposed bundle’s permissions separately.
Explore building this idea
Start with the prototype plan and compare it with the existing alternatives. The consumer page shows how the proposed benefit and price could be presented to owners.
Go to the prototype plan ↑View ScreenLatch for owners ↗07 / Sources
Sources behind this idea.
Post dates show when the underlying evidence appeared; checked dates show when the source was reviewed.
- Official arcade build and attachment instructions ↗Pollen Robotics — official project · Post · Checked
Current instructions name the screen/USB setup and glue the outer arcade shell to the robot without a snap or screw fixing. Relevant file last changed April 7. A maker build, not an owner complaint or a test of the proposed mount. Its attachment instructions do not establish how often owners remove the shell.
- Recent customization examples ↗Pollen Robotics — curated community links · Checked
Relevant entries dated September 28 and October 1, 2026 document pumpkin customization. Underlying original posts were not independently retrieved. Supports customization, not arcade adoption or a removal request. Curated examples and likes are not independent complaint counts or demand.
- Current hardware and customization FAQ ↗Pollen Robotics · Checked
Documents customization and shared mechanical design of Lite/Wireless, with different electronics. Undated current guidance; does not approve added display mass, mounting areas or universal fit.
- Existing pin-joined pumpkin costume ↗Pollen Robotics — official project · Checked
Body pieces already use joining pins; an optional head cover can use thin tape. Relevant file date not established. It does not demonstrate a removable arcade carrier; different costumes already use different attachment methods.
- Skin repository permissions ↗Pollen Robotics · Post · Checked
Root README labels the work CC BY-NC 4.0; relevant file last changed May 26. Commercial bundles need a permissions review. No permission or manufacturer endorsement obtained for this concept.
- Current Lite offer and form ↗Pollen Robotics store · Checked
Lite orderable at displayed €350 EUR; images/specifications show its articulated head, body and antennas. Lead time up to 90 days. Ordering status is not an installed-base estimate; photos do not verify fit.